By Terry Sovil from the September 2016 Edition
There are huge books dedicated to knots. Fancy, decorative knots and working knots. Knots to secure cargo on a truck.
Knots for sailors. Knots for scuba divers. Any application you can think of probably has a knot for it. There are three we will cover here: The bowline, half hitches and the sheet bend. I do know that if you learn these three basic knots, you can pass as a scuba diver or a sailor.
Actually, you’d probably need 2-3 more for dock cleats, etc. to be a sailor. But these three knots will get you pretty far in life.
Grab a short piece of line and practice! These three knots are part of the PADI Search and Recovery Specialty dive course.
You will often use line to set up search patterns and then, if the item is heavy, more than 20 pounds, you will need to tie the object to a lift bag.
ROPE
General Tips and Information
Taking care of your rope is critical to your safety and for the security of whatever you are using the rope for. Be aware of a rope’s working load. This is a big item for safety. Cutting rope to size is easy if you do it correctly.
Avoid using rope that shows signs of aging and wear. Inspect your rope for cuts, worn spots and for discoloration that can indicate chemical deterioration.
Avoid knotting and abrasive conditions. Knots reduce the breaking strength of rope as much as 40%. Energy which is normally spread over the entire length of rope directs itself to the knot. For this reason, splicing is preferred to knotting. Rope will wear excessively when used with pulleys that are too small.
Avoid excessive heat and prolonged exposure to direct sunlight. Use of rope where temperatures exceed 140 degrees F / 60 degrees C can seriously affect the strength of the rope. Rope can be severely weakened subject to prolonged exposure to ultraviolet rays of sunlight.
Avoid sharp angles. Sharp bends greatly reduce the strength of a rope.
Working loads. It is impossible to come up with “general rules” because of the variety of rope materials, rope use, age, condition, exposure to factors that affect rope behavior and the degree of risk based on what you are doing. Guidelines are almost always printed on the package that the rope is sold in. Be aware of breaking strength.
Remember that if the breaking strength is 48 pounds of pressure, that by tying a knot in it you are decreasing that by up to 40%. A general safety rule is to NEVER stand in line or within a 45 degree angle of a rope under tension. Should the rope break, or part, especially nylon, it may recoil with sudden force and cause serious injury or death.
Cutting a rope. Rope is made of all different types of materials. Cutting some ropes will cause the individual strands to start to unravel or unwrap. What you should do is wrap a piece of tape around the rope in the area you want to cut. Then, using a scissor, make the cut right in the middle of the tape. That will keep both ends from unraveling. The term “whipping” describes making the end of the rope so it won’t unravel.
Many types of rope can be secured by melting the tip with a cigarette lighter, a match or over the stove. Be careful. Some may burn, melt and drip. Other types may need to have the end whipped which is the use of a  smaller line or heavy thread and doing wraps around the end. Good adhesive tape may work as well.
KNOTS
It is important to understand the names given to parts of a rope when you start to work with it and tie a knot. The “standing part” is the line itself. If it is 100’ / 30m long, it is the standing part. The “bitter end” is just that, the very end of the rope where you will tie a knot. A “bight” is a curved section of line between the two ends.
The Bowline
 are going to secure it to, comes back and makes Above are two examples of tying this knot. They show the same thing but I like the black and white photo as it allows more emphasis on the initial start of the knot. Look at #1 in the black/white photo.
It is really IMPORTANT that you bend the rope like you see it here. The loop, or bend, is on top of the standing part of the line. So you put a turn in the line going counter clockwise in this example. Now the line goes behind the bight and back into the loop for the knot. Look at the black/white illustration #2 and the leftmost and middle example in the color illustration.
The line comes UP into the bight and then behind the standing part of the line and then back out through the same bight. The expression some use is “the rabbit comes up out of the hole, runs around the tree and then goes back into the hole”. Now if you grab the standing part above the knot and then hold the bitter end and the line lying next to it and pull, you will end up with a knot that looks like #3 in the black/white photo.
Half Hitch
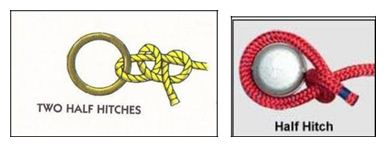 This is a fairly easy knot and pretty easy to see from the examples how to tie it. The line goes through, or around, what you a turn for a half hitch. Using two turns will secure it better than one. With one turn it needs constant tension on the rope to keep it secure. With two it will hold without tension. Pull on the bitter end to tighten it up.
Sheet Bend
The sheet bend is used to connect, or tie, two different sized lines together. It can be a bit confusing the first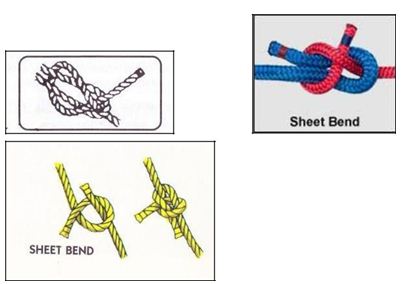 couple of times you try it but, if you look closely at the example on the left (black/white) and then the color one in the middle, you will see it isn’t too difficult. Take one line and bend it back on itself. In the color example, the blue line gets a bend in it. Now take the other line, red, and run it in to the bend in the blue line from the bottom, circle the blue line, and then go back under the red line. Pull and the knot will tighten. The illustration on the far right gives another perspective.
Download the full edition or view it online
—
Terry is a founding partner and scuba instructor for Aquatic Sports and Adventures (Deportes y Aventuras Acuáticas) in Manzanillo. A PADI (Professional Association of Dive Instructors) Master Instructor in his 36th year as a PADI Professional. He also holds 15 Specialty Instructor Course ratings. Terry held a US Coast Guard 50-Ton Masters (Captain’s) License. In his past corporate life, he worked in computers from 1973 to 2005 from a computer operator to a project manager for companies including GE Capital Fleet Services and Target. From 2005 to 2008, he developed and oversaw delivery of training to Target’s Loss Prevention (Asset Protection) employees on the West Coast, USA. He led a network of 80+ instructors, evaluated training, performed needs assessments and gathered feedback on the delivery of training, conducted training in Crisis Leadership and Non-Violent Crisis Intervention to Target executives. Independently, he has taught hundreds of hours of skills-based training in American Red Cross CPR, First Aid, SCUBA and sailing and managed a staff of Project Managers at LogicBay in the production of multi-media training and web sites in a fast-paced environment of artists, instructional designers, writers and developers, creating a variety of interactive training and support products for Fortune 1000 companies.